On many occasions, installing an FTP server is useful for sharing files on the network. This can be used in companies or small networks according to the circumstances. So to make the process easier, we present you this post to learn how to install and configure PROFTPD on Ubuntu / Debian.
ProFTPD
PROFTPD is a highly configurable GPL-licensed FTP server software. It stands out for being highly configurable and for having great documentation available for all users.
PROFTPD is used by many users worldwide because of the security policies that make it perfect for professional environments. As it is so popular, it is available for installation on Ubuntu and Debian so we can have an FTP server in a matter of minutes.
So we better get started.
Before starting
Before we start it is necessary to know what we need or will use to complete this tutorial successfully.
First, if you want to perform the tutorial on a remote server, you must have access to the server via SSH. Otherwise, you only need to open a terminal to follow it.
Secondly, you need to have a user who has permission to use the sudo command. This will be vital for many tasks.
Of course, we need a computer with Ubuntu 20.04 that has a recent installation.
Install and configure PROFTPD on Ubuntu/Debian
The first thing we have to do is to update the whole operating system in the following way
sudo apt update
sudo apt upgrade
Already with the updated operating system, we can install PROFTPD without problems by running
sudo apt install proftpd
After entering the user’s password, the process will start normally. This program is quite light, so everything should run smoothly.
When installed, it will automatically be configured to run with the system and the service is already running.
To stop the service, run it:
sudo systemctl stop proftpd
To start the service:
sudo systemctl start proftpd
Or restart it:
sudo systemctl restart proftpd
But we can also check the status of the service
sudo systemctl status proftpd
Sample Output
● proftpd.service - LSB: Starts ProFTPD daemon
      Loaded: loaded (/etc/init.d/proftpd; generated)
      Active: active (running) since Fri 2021-01-08 18:29:35 CET; 48s ago
        Docs: man:systemd-sysv-generator(8)
       Tasks: 1 (limit: 4567)
      Memory: 2.7M
      CGroup: /system.slice/proftpd.service
              └─10184 proftpd: (accepting connections)
 Jan 08 18:29:35 imaginelinux systemd[1]: Starting LSB: Starts ProFTPD daemon…
 Jan 08 18:29:35 imaginelinux proftpd[10161]:  * Starting ftp server proftpd
 Jan 08 18:29:35 imaginelinux proftpd[10183]: 2021-01-08 18:29:35,250 imaginelinux proftpd[10183]: processing configuration directory '/etc/proftpd/conf.d/'
 Jan 08 18:29:35 imaginelinux proftpd[10161]:    …done.
 Jan 08 18:29:35 imaginelinux systemd[1]: Started LSB: Starts ProFTPD daemon.
In other words, PROFTPD is running correctly.
Add a new user for PROFTPD
At PROFTPD access to anonymous users is restricted for security reasons. So we have to create a new user to use the server.
So, to do this, run the following user:
sudo useradd -m -s /bin/bash ftpuser
You can replace ftpuser with the user name. In this case, I have added the -m option to create a home directory although this is not mandatory. It all depends on your needs.
Then, assign a password:
ftpuser passwd
Sample Output:
New password:
Retype new password:
passwd: password updated successfully
Configuring PROFTPD on Ubuntu / Debian
Most of the settings that can be made in PROFTPD are in the /etc/proftpd/proftpd.conf file that we have to modify.
Before modifying it, it is convenient to make a backup of the original file that we can use if we have a problem later.
sudo cp /etc/proftpd/proftpd.conf /etc/proftpd/proftpd.conf.bak
sudo nano /etc/proftpd/proftpd.conf
This file is somewhat extensive, but really little needs to be modified if we want to have the FTP server active.
The most important directive is DefaultRoot because it sets the default directory when the user connects.
If the directive is set to ~ then they are restricted to their home folder. It is also possible to define another folder, for example:
DefaultRoot /home/user/Documents
Or whatever else you need.
You can also use various directives to set each user to the default directory. For example:
DefaultRoot /home/ftp A
DefaultRoot / B
This indicates that user A will be logged in to the /home/ftp directory and user B will be logged in to the entire system.
For this example, I will only make the user log in to their home directory.
DefaultRoot ~
It is also a good idea to define your server name in the ServerName directive.
ServerName "Atechtown"
The default port for FTP is 21 but you can also change this in the Port directive
Port [port]
Other useful options are those of AccessGrantMsg to give a welcome message
AccessGrantMsg "Welcome to the Atechtown FTP server"
And AccessDenyMsg to give one for a rejection or when the connection is not successful.
AccessDenyMsg "Not Welcome"
Both options must be added at the end of the file.

Close the editor by pressing CTRL + X and when asked to save changes press Y and then Enter.
Enable encryption in PROFTPD
By default, all data transmission on an FTP server is done in an insecure manner. However, PROFTPD supports TLS so we can increase security. This is vital if you think your FTP server is available from the Internet.
So, it is up to us to generate a new security certificate and add it to PROFTPD.
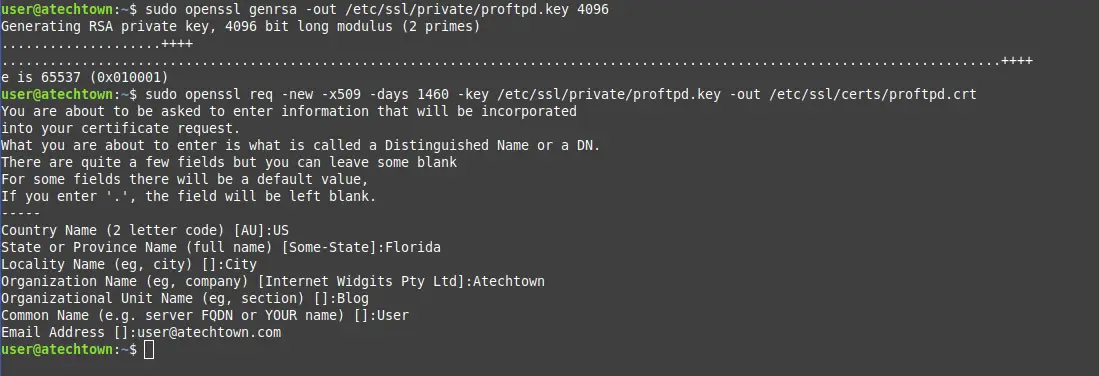
First, generate the private key by running the following command:
sudo openssl genrsa -out /etc/ssl/private/proftpd.key 4096
4096 is the number in bits of it, this you can increase if you want.
And then, it generates as such the certificate using also the previously created key.
sudo openssl req -new -x509 -days 1460 -key /etc/ssl/private/proftpd.key -out /etc/ssl/certs/proftpd.crt
This certificate has an expiration date of 1460 days. This can also be changed.
During the process, you will be asked some questions related to the certificate. In this case, I have typed sample data, but in your case, it should be correct data.
Now it is time to add it to PROFTPD. In the configuration file, you have to enable the TLS configuration file.
sudo nano /etc/proftpd/proftpd.conf
And look for the line
#Include /etc/proftpd/tls.conf
And change it to:
Include /etc/proftpd/tls.conf
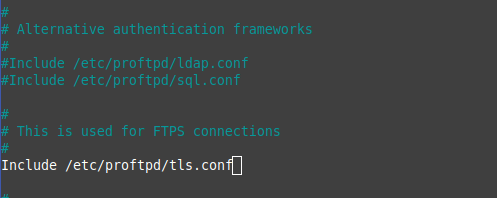
Again, save the changes and close the file.
Now, make sure that the key files are protected and cannot be modified by anyone.
sudo chmod 0600 /etc/ssl/private/proftpd.key
sudo chmod 0600 /etc/ssl/certs/proftpd.crt
Now, restart the PROFTPD service to apply the changes
sudo systemctl restart proftpd
And check the status of the service to see if everything is going well.
sudo systemctl status proftpd
Sample Output:
● proftpd.service - LSB: Starts ProFTPD daemon
      Loaded: loaded (/etc/init.d/proftpd; generated)
      Active: active (running) since Fri 2021-01-08 19:05:39 CET; 6s ago
        Docs: man:systemd-sysv-generator(8)
     Process: 11337 ExecStart=/etc/init.d/proftpd start (code=exited, status=0/SUCCESS)
       Tasks: 1 (limit: 4567)
      Memory: 2.7M
      CGroup: /system.slice/proftpd.service
              └─11352 proftpd: (accepting connections)
 Jan 08 19:05:39 imaginelinux systemd[1]: Starting LSB: Starts ProFTPD daemon…
 Jan 08 19:05:39 imaginelinux proftpd[11337]:  * Starting ftp server proftpd
 Jan 08 19:05:39 imaginelinux proftpd[11351]: 2021-01-08 19:05:39,493 imaginelinux proftpd[11351]: processing configuration directory '/etc/proftpd/conf.d/'
 Jan 08 19:05:39 imaginelinux proftpd[11337]:    …done.
 Jan 08 19:05:39 imaginelinux systemd[1]: Started LSB: Starts ProFTPD daemon.
We are ready for the test.
Testing PROFTPD on Ubuntu / Debian
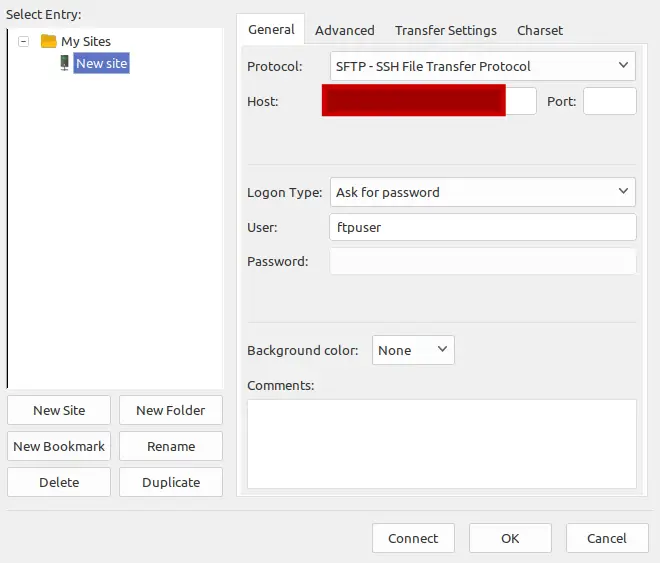
To do the test you have to install an FTP client. In this case, I have installed Filezilla which is available for Windows, Linux, and MacOS.
In the case of Ubuntu and Debian, you can install it running:
sudo apt install filezilla
Once it starts, the connection parameters must be established. To do this, go to the File menu and then click on Site Manager.
There you will be able to establish a connection where you will have to type the IP address of the server or the hostname, if you have not modified the port, leave it blank. You will also have to write down the username. As it is in the image.
Now click on Connect and when you make the connection, you will be informed that you have to accept the server’s certificate.
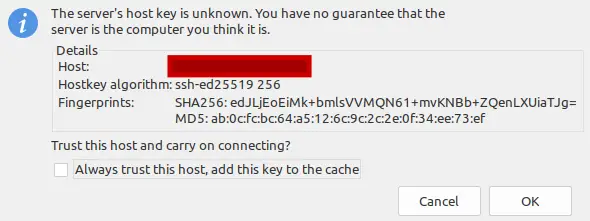
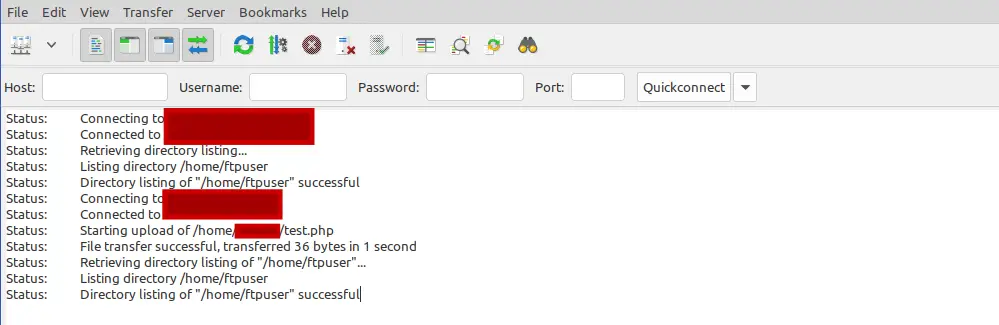
You will then see Filezilla connect and you can start the file transfer.
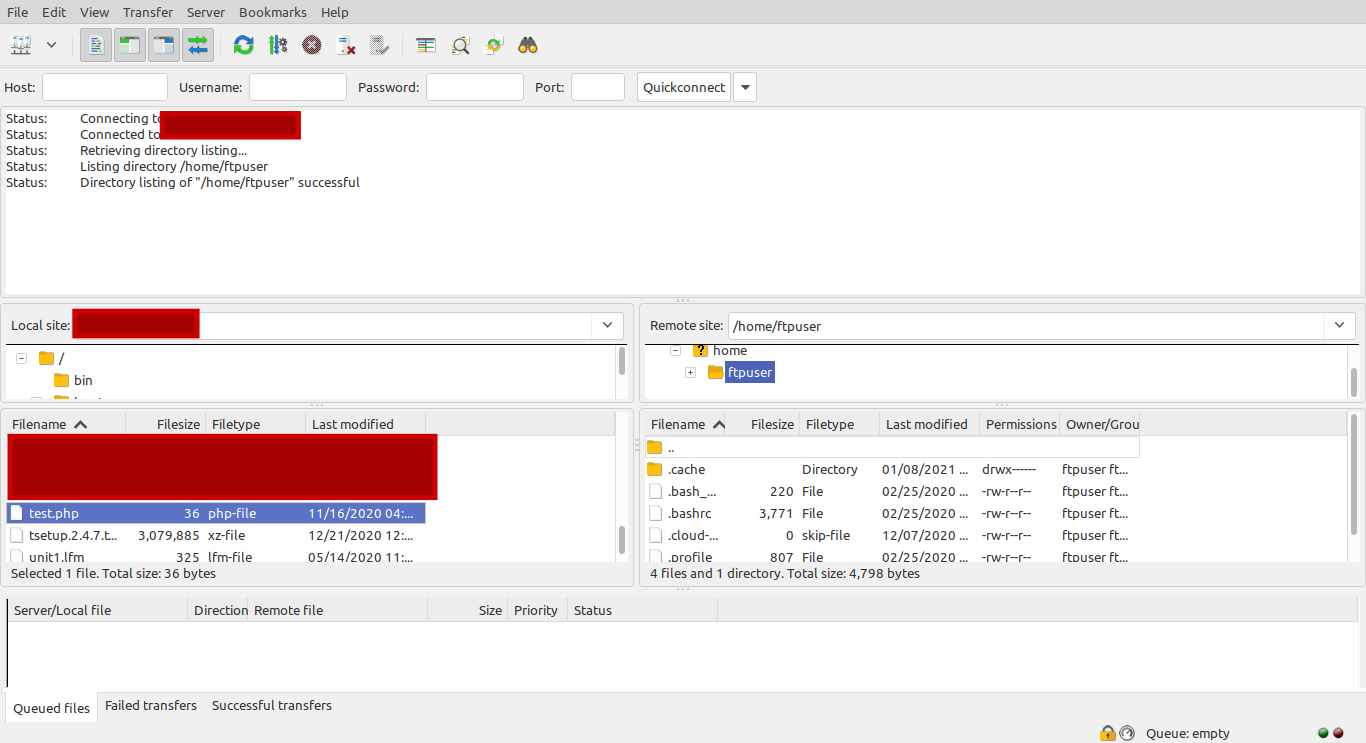
In this case, from my local computer, I have uploaded a file called test.php and it has been a successful process.
Now the process is ready and PROFTPD is ready for use.
Conclusion
PROFTPD is a quite complete and configurable software that allows us to deploy an FTP server quickly and with all the security measures. But I think the best thing is the flexibility and the many configuration options we have available.
Now we want to know about you, have you used an FTP server? what do you think? tell us in the comments and share the post