Steam is one of the most important game and application stores in the world. In addition to being a gaming reference on all platforms. Through it, you can buy, download, update and start the games or applications that you have purchased.
SteamCMD was born to deploy servers for certain games. It is a CLI tool that works like the graphical client but from the terminal.
According to the Steam developers Wiki, “its primary use is to install and update various dedicated servers available on Steam using a command-line interface”. So many sysadmin or gaming enthusiasts use it as their main tool to create dedicated servers for their favorite games.
One thing to note is that it works with games that use the SteamPipe content system. Therefore, not in all games you will be able to create dedicated servers.
So, this post is about how to install SteamCMD in Ubuntu , and we will do it getting the latest stable version.
Preparing the system for SteamCMD installation
Before making any changes to the system, it is advisable to update it completely.
sudo apt update
sudo apt upgrade
With this, our system will have all the security patches installed, and we will be able to continue with total security.
The next step is to install some necessary packages for SteamCMD.
sudo apt install wget screen lib32gcc1Now it’s time to install SteamCMD by choosing one of these two methods.
Method 1: Install SteamCMD using the official repositories of Ubuntu
This method is the most recommended because we don’t have to do much, and it will be perfectly integrated into the system.
First, enable the multiverse repository by running
sudo add-apt-repository multiversethen enable the support for the i386 architecture
sudo dpkg --add-architecture i386Refresh APT
sudo apt updateAnd finally install SteamCMD
sudo apt install lib32gcc-s1 steamcmdFinally, create a symbolic link
sudo ln -s /usr/games/steamcmd /home/steam/steamcmdand to run it
cd ~
steamcmd
Method 2: Install SteamCMD on Ubuntu manually
This method provides us with the latest stable version as well as being very flexible. First, it installs a package needed for the process.
sudo apt install lib32gcc1Then, it is a good practice to have a dedicated user running SteamCMD who is not root.
adduser steamAssign a strong password and complete the process.
Then, change the login to the user we just created.
su - steamCreate the folder required for downloading and installing SteamCMD.
mkdir -p /home/steam/steamcmdNow access it
cd /home/steam/steamcmdNow from there, download SteamCMD using wget
wget http://media.steampowered.com/installer/steamcmd_linux.tar.gz
Then, decompress the file
tar -xvzf steamcmd_linux.tar.gzAccess the newly created folder
cd /home/steam/steamcmdAnd finally run SteamCMD
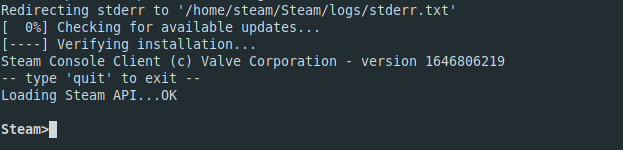
./steamcmd.shWhen you run it, it will start downloading and updating the whole application.
Finally, you will see how the prompt changes
> steam
To finish, you can exit by pressing the keys CTRL + C and to restart it.
./steamcmd.shWe are done.
Conclusion
SteamCMD is yet another effort to push Linux gaming forward and grow over time. So in this post, you learned how to install SteamCMD using two different methods to do so.
I hope you found this post useful. Share it and help us to grow.
The first method works but the subsequent force_install_dir does not.
Thanks for this post, on Ubuntu 22.04 the first method didn’t work but the second method worked and I have the console now 🙂
That’s great.