As is well known, Git is a vital tool for application development. Therefore, there are repository hosting tools that use it, such as GitLab or GitHub. However, if you learn how to install Gitea on Ubuntu 20.04 you will be able to have your Git server for your private projects and teams. This is the goal of this post.
What is Gitea?
Gitea is a gogs fork, so it is a web server for Git repositories like GitHub or GitLab. With it, we can manage the git users and repositories of our projects.
Applications like Gitea find their place in private enterprise projects where it is not required that the code is in the hands of third parties. In addition to this, it is fascinating in small teams or educational projects.
Some features such as commit signing or two-factor authentication can be decisive aspects in the adoption of Gitea over Gogs, for example. So let’s get started.
Install Gitea on Ubuntu 20.04
Install MariaDB on Ubuntu 20.04
Gitea requires a database manager to be able to control the data that is being created. It is compatible with PostgreSQL, MariaDB and SQLite, although the latter is only for small teams. So, in this post, we will use MariaDB.
First, install some necessary packages
sudo apt install git unzip gnupg2Then, install MariaDB by running
sudo apt install mariadb-server
When finished, set the root password and secure the installation.
sudo mysql_secure_installationWhen you set the root password, then answer Y to all the questions you will be asked.
Next, you have to make some configurations in MariaDB. Edit the configuration file.
sudo nano /etc/mysql/mariadb.conf.d/50-server.cnfAnd add the following
innodb_file_format = Barracuda
innodb_large_prefix = 1
innodb_default_row_format = dynamic
Save the changes and close the editor. To apply the changes, restart the MariaDB service
sudo systemctl restart mariadb The next step is to create the database and the MariaDB user dedicated to Gitea.
Open the shell,
sudo mysql -u root -pCreate the database. I will call it gitea.
CREATE DATABASE gitea CHARACTER SET 'utf8mb4' COLLATE 'utf8mb4_unicode_ci';Now create the user by assigning permissions on the newly created database.
Be sure to define a strong password.
GRANT ALL ON gitea.* TO 'user'@'localhost' IDENTIFIED BY 'password';Refresh the permissions and exit the shell
FLUSH PRIVILEGES;
exit;
We are done with MariaDB. Let’s continue.
Preparing the system for Gitea
Before downloading Gitea, we need to introduce some changes to the system. It is not a big deal.
First, we need to create a new user for git.
sudo adduser --system --shell /bin/bash --group --disabled-password --home /home/git git
Then create the directory structure that Gitea will work with.
sudo mkdir -p /var/lib/gitea/{custom,data,log} All these created directories have to be owned by the git user we created before.
sudo chown -R git:git /var/lib/gitea/{custom,data,log} Then, assign them appropriate permissions.
sudo chmod -R 750 /var/lib/gitea/{custom,data,log} Furthermore, we have to create another directory dedicated to Gitea configuration.
sudo mkdir /etc/gitea This directory has to be owned by the root user and with appropriate permissions
sudo chown root:git /etc/gitea
sudo chmod 770 /etc/gitea
Now we can download the Gitea binary.
Download Gitea on Ubuntu 20.04
Gitea is distributed as a binary that we have to download into the system. So to complete this we have to run
wget https://dl.gitea.io/gitea/1.15.8/gitea-1.15.8-linux-amd64 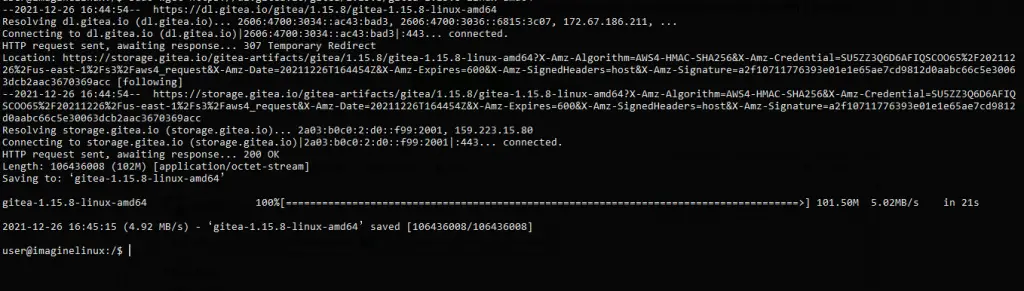
Currently, the latest stable version is 1.15.8 to know which one it is, I recommend you first visit the project website.
Now move the binary to /usr/bin/gitea with the appropriate permissions
sudo mv gitea-1.15.8-linux-amd64 /usr/bin/gitea
sudo chmod 755 /usr/bin/gitea
To start, stop, restart and check the status of Gitea, we have to create a new service.
First, create the file
sudo nano /etc/systemd/system/gitea.service Then, add the following
[Unit]
Description=Gitea
After=syslog.target
After=network.target
After=mysql.service

[Service]
RestartSec=2s
Type=simple
User=git
Group=git
WorkingDirectory=/var/lib/gitea/
ExecStart=/usr/bin/gitea web -c /etc/gitea/app.ini
Restart=always
Environment=USER=git HOME=/home/git GITEA_WORK_DIR=/var/lib/gitea

[Install]
WantedBy=multi-user.target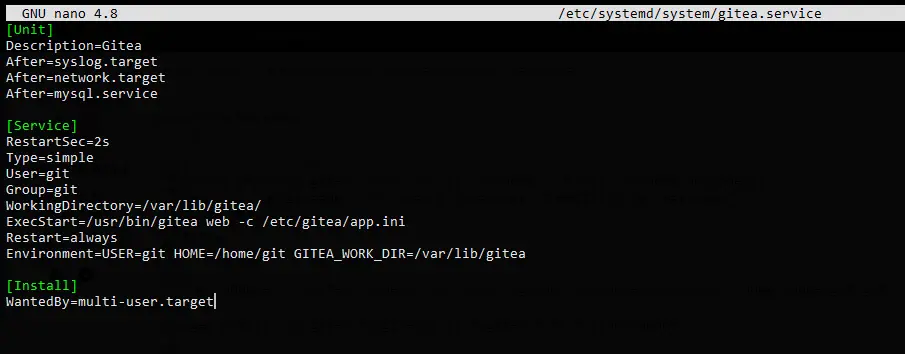
Save the changes and close the editor.
To apply the new service, then run
sudo systemctl daemon-reload You can then enable the service so that Gitea starts with the system.
sudo systemctl enable gitea
Created symlink /etc/systemd/system/multi-user.target.wants/gitea.service → /etc/systemd/system/gitea.service.
And now initialize
sudo systemctl start gitea
Finally, check the status of the service.
sudo systemctl status gitea 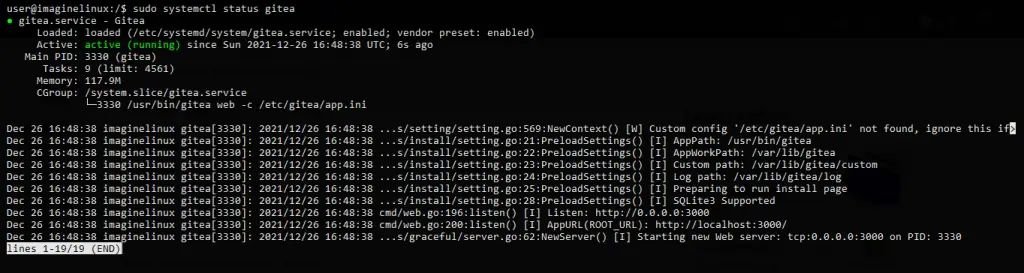
Ngnix as reverse proxy
This step is optional but recommended for better access to gitea. So, install Nginx.
sudo apt install nginx Create a new configuration file
sudo nano /etc/nginx/conf.d/gitea.conf And add the following information
upstream gitea {
     server 127.0.0.1:3000;
 }
 server {
     listen 80;
     server_name your-domain;
     root /var/lib/gitea/public;
     access_log off;
     error_log off;

location / {
try_files maintain.html $uri $uri/index.html @node;
}

location @node {
client_max_body_size 0;
proxy_pass http://localhost:3000;
proxy_set_header X-Forwarded-For
$proxy_add_x_forwarded_for;
proxy_set_header X-Real-IP $remote_addr;
proxy_set_header Host $http_host;
proxy_set_header X-Forwarded-Proto $scheme;
proxy_max_temp_file_size 0;
proxy_redirect off;
proxy_read_timeout 120;
}
 }
Replace server_name with your domain.
Save the changes and close the editor.
Apply the new Nginx configuration by running
sudo systemctl restart nginx If you want to enable HTTPS, then install a certificate with Let’s Encrypt.
First install the necessary packages
sudo apt install certbot python3-certbot-nginx Create and install the new certificate by running
sudo certbot --nginx --agree-tos --redirect --hsts --staple-ocsp --email [your-email] -d [your-domain]
Finally, restart Nginx.
sudo systemctl restart nginx
Access to the Gitea instance
Open your web browser and go to https://your-domain where you will see the following screen
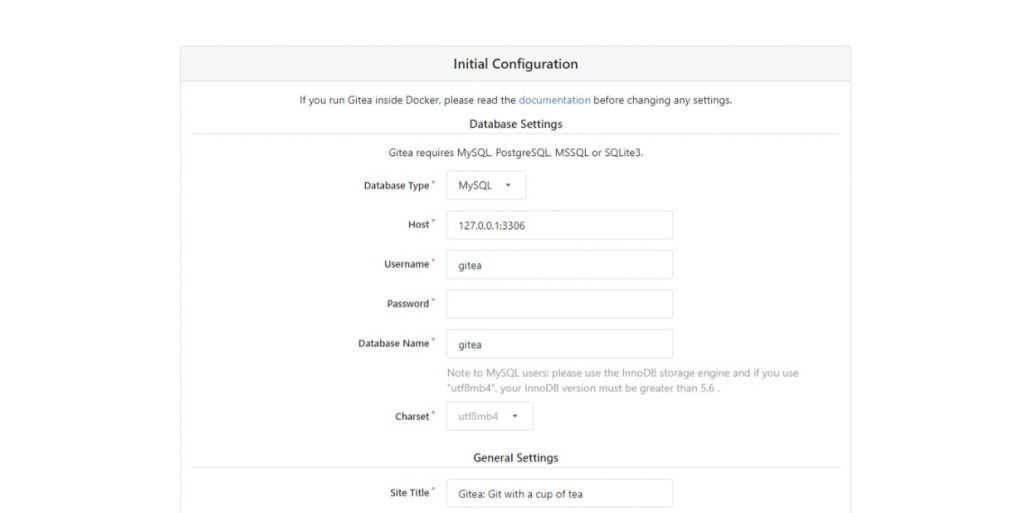
In this part, you have to define the type of database to use. As well as the credentials.
Further down, you can define the site title, the repository paths, and the BaseURL which has to be your domain.
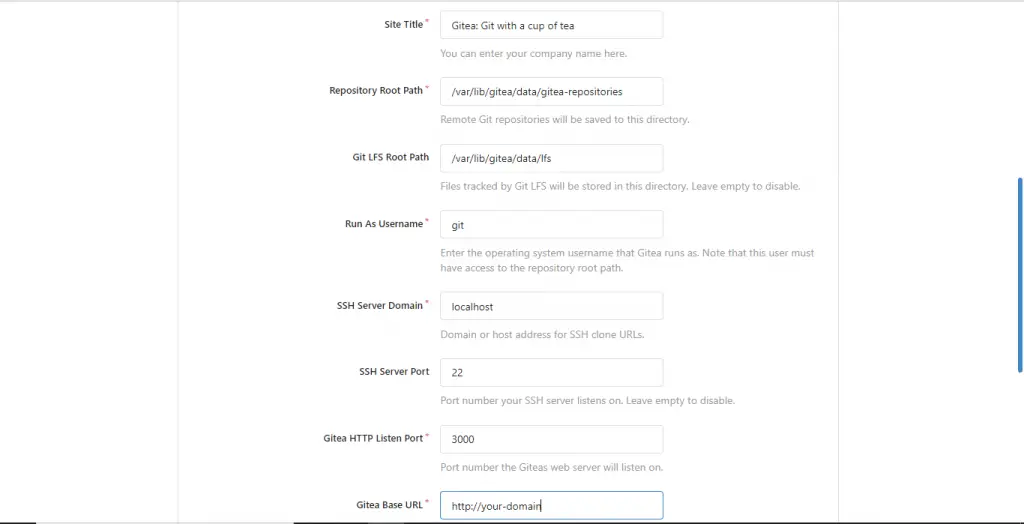
Finally, you have to create an administrator user.
If all the process has been successful, you will be redirected to the application dashboard.

We are done, Gitea is fully working.
Conclusion
Thanks to this post, you learned how to install Gitea on Ubuntu 20.04 on your server and thus better manage your repositories in a private and self-hosted way.
Help us to grow and be even more known by sharing our posts.