Although it is common to use SSH, it is not so well known to many users what is the SSH keys generation on Ubuntu | Debian. That is why today you will learn how to do it, and you will realize how simple it is.
An SSH key is one of two files used in an authentication method known as SSH public key authentication. They are used to access our Dedicated, Cloud or VPS Servers securely and through the command line.
In this authentication method, one file (known as the private key) is generally kept on the client side and the other file (known as the public key) is stored on the server side.
In this way, both computers can recognize each other’s key and establish a trusted connection between them.
On Linux, the process of creating SSH keys is easy and available to everyone. In the case of other systems such as Windows, although not complex, additional software is required.
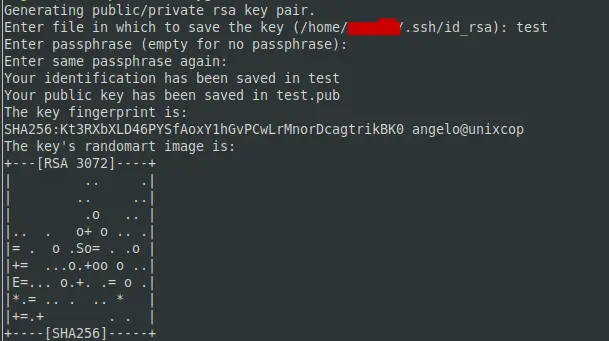
Generate SSH keys on Ubuntu | Debian
For this post, you will need to use the terminal. So, you can open one from the main menu.
When you open it, the command to generate SSH keys is as follows ssh-keygen.
ssh-keygenAs soon as you run it, you will be asked for the name of what the SSH key will be called.
Then, you have the option to add a security passphrase. This passphrase works as an additional layer of security, since when you log into the server with the SSH key, you will be asked to enter it. In other words, it is a way to further protect the key. It is not mandatory, but it is recommended.
After this, the key will be created.
To confirm the creation of the key, just access the SSH key directory
cd ~/.sshAnd show the created files
lsSample Output:
id_rsa id_rsa.pubAs you can see, there is the private key and the public key. This last one is the one that you will have to copy on the server. On the other hand, the same output screen will tell you the type of key that has been created.
Customizing the SSH key
In the above example, a default 3072 bits RSA key has been created.
By default, the SSH encryption algorithm is RSA. It is currently one of the strongest available and with some exceptions, you should have no problems with it. The other options are.
Each of them supports different key sizes.
So using the -t options you can change the cipher and with the -b option the key size.
For example,
ssh-keygen -t rsa -b 2048The procedure will be the same, but changing the size.
Copy the generated key to the server
Now you need to copy the key to the server. The procedure is simple, just run.
ssh -i ~/.ssh/key-name [user]@[server]As you can see, the command is explicit, you simply invoke ssh with the -i option and pass the full path to the key. Then, as an option goes, the username on the server and the IP address or the name of the server.
Then you can log in.
Log in to the remote server
Once you have the SSH key on the server, the next step is to log into the server.
For this, the syntax has not changed, you can do it with this command
ssh [user]@[server]The difference is that when the server recognizes the key, it will open a window asking for the passphrase to unlock the private key and compare it with the public one.
By entering the passphrase, the client, and server will exchange keys and recognize each other as trusted, thus making the connection and therefore the login.
The process is still simple.
Disabling password access in SSH
The main purpose of using SSH keys is to further protect the server. Moreover, to prevent the user from using passwords that can be intercepted during transmission.
So, the best thing to do from now on is not to allow users to log in using passwords.
To achieve this, open the SSH configuration file with the text editor of your choice.
sudo vi /etc/ssh/sshd_configAnd inside the file, look for the following directive
PasswordAuthenticationWhen you do so, set it to no.
PasswordAuthentication noOther directives you should modify are:
ChallengeResponseAuthentication
UsePAM
For both of these, set them to no value.
ChallengeResponseAuthentication no
UsePAM no
Save the changes and close the editor.
To apply the changes, you can restart the SSH server.
sudo systemctl restart sshThis will be enough.
Conclusion
The creation of SSH keys is easy thanks to the Linux terminal and the integration of the tool with the operating system. I hope you liked the post and help to share it with more people.