Often times, managing the memory of a server is a process that must always be considered when managing an operating system. Besides that, if you are a networking student, it might be useful to clear your DNS cache.
Introduction
One of the main reasons to clear the DNS Cache of our system is related to the suspicion of attacks on our network. Apart from this, it is a good way to know if the router is doing its job correctly.
The process is easy to do, so there should be no problem to do it.
Let’s get started.
What is DNS cache and its use
Without wanting to complicate your life, the DNS cache is a record of the websites you have visited. When you want to go to a website from the browser, this record will be the first place to look.
The problem is that over time, it is possible that they become corrupted, bringing problems when accessing websites. On Linux, it is easy to solve, although there are web browsers that do not depend on the system to do the deletion.
So in summary, the DNS cache is an advantage, but you have to be careful with it.
How to flush DNS Cache on Ubuntu
On Ubuntu, the process is effortless to do because it includes the systemd-resolve command, which you can use quickly to do the process.
In short, open the terminal and with root or sudo permissions, run this command
systemd-resolve --flush-cachesFor example,
sudo systemd-resolve --flush-cachesThe command will not generate any on-screen output, so don’t worry about it.
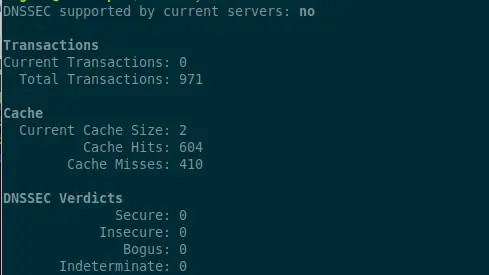
But to get the changes, you can use this command
sudo systemd-resolve --statisticsThere you will get a very informative screen output
How to flush DNS Cache on RHEL and derivatives
In any case, if you use a distro like RHEL or a derivative like Rocky Linux / Alma Linux / CentOS or any other, you can flush the cache with a different method. This is because the above commands do not work on these distros.
So, it remains, use another method. To achieve this, you can run either of these two commands:
sudo systemctl restart nscd.serviceOr
sudo systemctl restart namedAs you can see, it is easy.
Other methods for other Linux distributions
In case you use other Linux distributions, you can use other commands to get the same result.
For example, you can use signals to clear the DNS cache. To achieve this, open a terminal and run.
sudo killall -USR2 systemd-resolvedIf you want to check the changes, then you have to run these commands
sudo killall -USR1 systemd-resolved
sudo journalctl -r -u systemd-resolved
Then you will have an output similar to this
.
.
.
Oct 04 17:38:24 pc systemd-resolved[724]: Flushed all caches.
Oct 04 17:38:22 pc systemd-resolved[724]: Flushed all caches.
Oct 04 17:28:14 pc systemd-resolved[724]: Flushed all caches.
.
.
Another way to achieve the goal is with dnsmasq. First, find out if it is running as system service.
sudo systemctl is-active dnsmasqIf the answer is that it is active, then just restart it
sudo systemctl restart dnsmasqBut in case it is not running as a service, you can still clear the DNS cache using dnsmasq. To achieve this, run this command:
sudo killall -HUP dnsmasqThis is how quickly and easily you can achieve the goal. To check the changes, just check the system logs.
tail -f -n1000 /var/log/syslog | grep "cache"Then you will have a screen output like this
Oct 4 17:10:01 pc systemd[1396]: Listening on GnuPG cryptographic agent and passphrase cache (access for web browsers).
Oct 4 17:10:01 pc systemd[1396]: Listening on GnuPG cryptographic agent and passphrase cache (restricted).
Oct 4 17:10:01 pc systemd[1396]: Listening on GnuPG cryptographic agent and passphrase cache.
Oct 4 17:28:14 pc systemd-resolved[724]: Flushed all caches.
Oct 4 17:38:22 pc systemd-resolved[724]: Flushed all caches.
Oct 4 17:38:24 pc systemd-resolved[724]: Flushed all caches.
Oct 4 17:46:06 pc systemd-resolved[724]: Flushed all caches.
As you can see, the process was successful.
Conclusion
In the study of networks, it can be important to protect the network a little more by clearing the DNS cache of the system. This will prevent possible attacks on the network, and you can solve some problems related to the cache.
I hope you liked this post and help us to share it with your friends.