The shell acts as an intermediary between the operating system and the user thanks to command lines that the latter enters. Its function is to read the command line, interpret its meaning, execute the command and then output the result on the screen. In this way, it is thanks to it that our commands work.
It is important to note that the shell is not the same as the terminal emulator. The terminal emulator is a program written in a programming language that makes use of the shell. So in Linux, we have Terminator, Konsole, Guake, and others, but the shell in those cases was bash.
While Zsh is another shell that although in the first instance does the same, the latter has other extra tools that make it very popular.
Introducing to Zsh
Referring to the Zsh website we have the following definition:
Zsh is a shell designed for interactive use, although it is also a powerful scripting language.
So with Zsh you can do the same as with bash but with additions that allow you to customize the experience.
So, many Linux users use it for their work with the terminal but also many desktop users looking to improve the terminal environment.
Installing Zsh on Ubuntu 20.04
Zsh is a program that can be easily found in the Ubuntu repositories. So to install it, open a terminal from the main menu or by pressing the CTRL + ALT + T keys.
Then run these two commands to install Zsh.
sudo apt update
sudo apt install zsh
Reading package lists... Done
Building dependency tree
Reading state information... Done
The following additional packages will be installed:
  zsh-common
Suggested packages:
  zsh-doc
The following NEW packages will be installed:
  zsh zsh-common
0 upgraded, 2 newly installed, 0 to remove and 19 not upgraded.
Need to get 4,450 kB of archives.
After this operation, 18.0 MB of additional disk space will be used.
Do you want to continue? [Y/n]
At the end of the installation, you can verify the version that has been installed.
zsh --version
zsh 5.8 (x86_64-ubuntu-linux-gnu)
Installing a shell other than bash does not cause it to be replaced. We have to indicate this to the system. To do this, just run.
chsh -s /usr/bin/zsh
And the changes will be applied after we log out and log back in.
Configuring Zsh on Ubuntu 20.04
When we have logged back into the system, we will be presented with the following screen.
Here we have the main Zsh configuration menu with several options. The most recommended option is (2) which enables the default configuration in the .zhrc file that we will have to modify if we want to add a change.
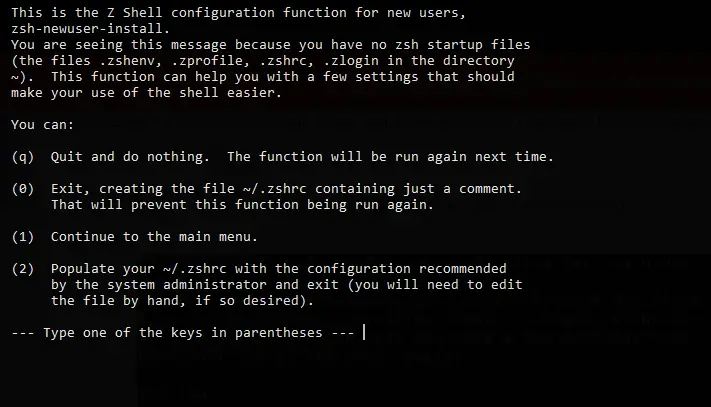
Although you can also choose option (1) where it will show you another menu where you can configure it by yourself interactively in the new shell.
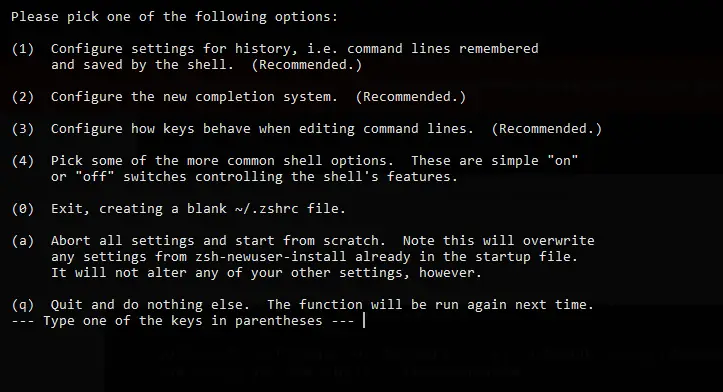
One of the most useful things you can do here is to enable command autocompletion. Choose the option (1) for this.
Configure what you want using the menu. When you are done you will return to the previous screen and apply the changes choose (0).
You will know that the configuration is finished when you see on the output screen that you can repeat the process by entering the following command
zsh-newuser-install -f
Now Zsh is ready to use.
Removing Zsh from Ubuntu 20.04
In case you want to remove Zsh from the system, you just have to run
sudo apt --purge autoremove zsh
And revert the shell change by running:
chsh -s $(which "SHELL NAME")
And there will be no trace of it left on the system and you will have bash back as the default shell.
Conclusion
Zsh is preferred by many as a solid alternative to the old Bash shell. However, we can have several shells installed and not necessarily in a conflict which makes it ideal for testing them until we find the one that best suits us.
Today, thanks to this post, you have learned how to install it and get it ready for the first use. So, share this post and leave us a comment.