While it is true that many people use the cloud to save files, it is also true that others continue to save information on USB drives. So today we’ll show you how to format a USB in Ubuntu in two different ways.
Many times, as a result of continuous use, it is convenient to format a USB drive. It is also useful if we want to use it in various operating systems or correct some errors that may occur.
So let’s go for it.
Ubuntu makes it easy for us natively
We already know that Ubuntu is a rookie-oriented system but so robust that anyone can use it for work.
Thanks to this, Formatting USB drive is quite simple with the tool that gives us the distribution from the same file browser.
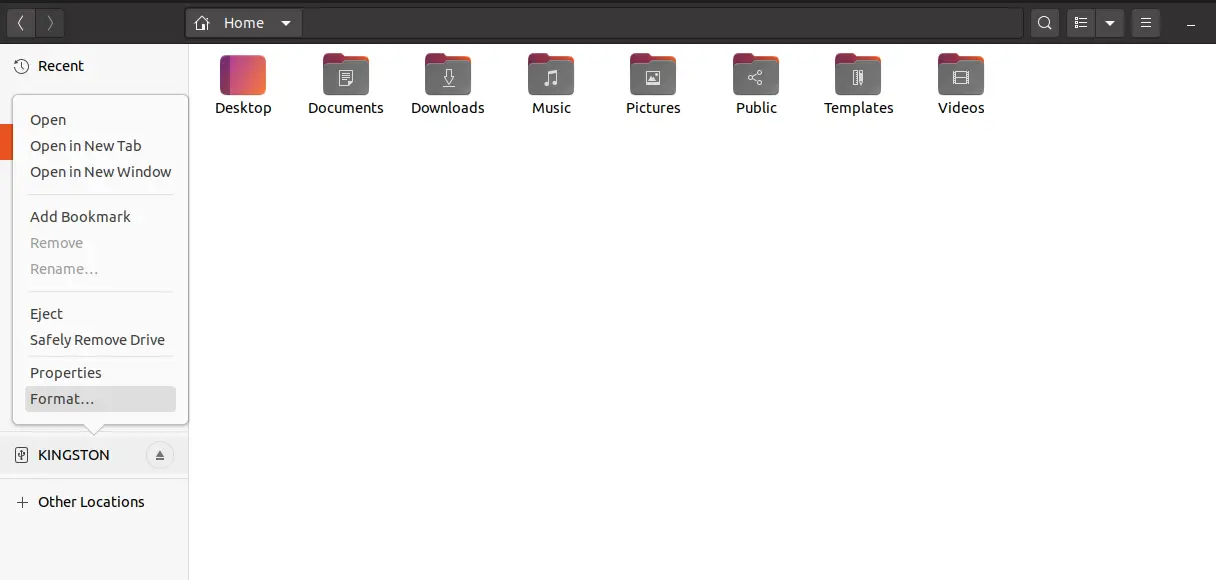
So, connect a USB drive and the file browser will open. In case it doesn’t open, you can do it from the main menu.
On the left side, you will see the name of your USB device.
In the menu that is shown, there are several options but the one that matters is Format. Click on it.
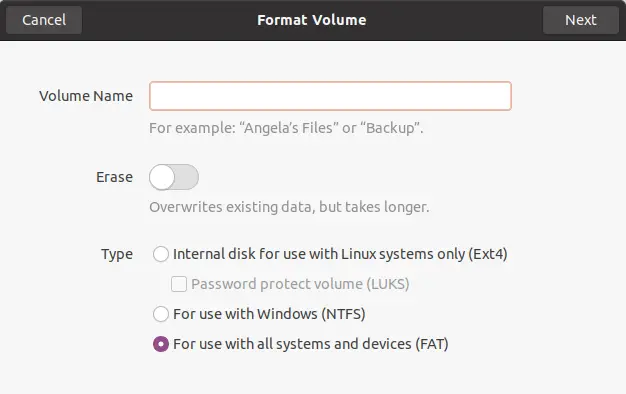
Then, you will see a window where you will start configuring the formatting. You can choose a name, the file system and you want to delete and not overwrite the data on the drive. All quite simple and clear. When you are done, click on Next.
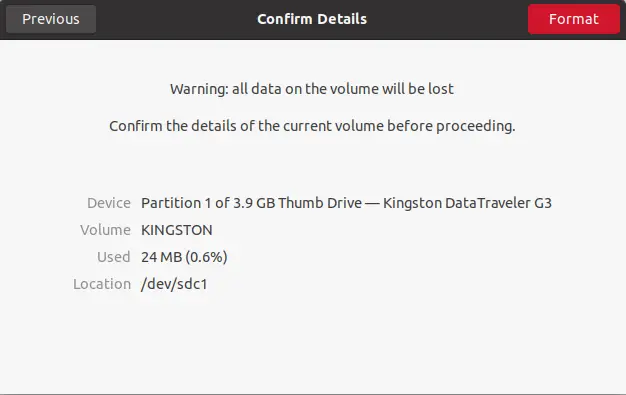
In this window, you will only have to confirm the process. When you are ready, click on Format and the process will start.
When you are done you can use your USB drive as standard.
Format a USB drive in Ubuntu with GParted
Usually, the above method is reliable but there are times when deeper tools like GParted are needed.
GParted is a mythical and classic tool for disk partitioning. You can also use it to format partitions, create new ones, delete them, and modify them.
This tool is included in the official repositories of most Linux distributions. So to install it in Ubuntu you only have to open a terminal and run it:
sudo apt install gparted
And then you can run it from the main menu.
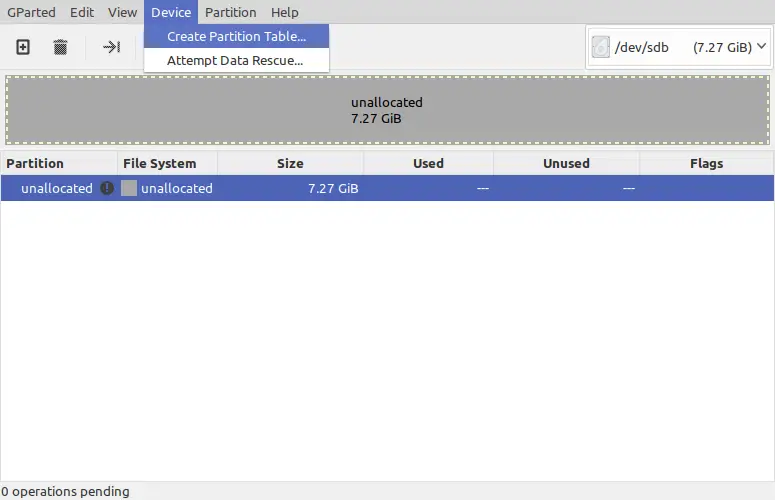
On the left side, you will see a drop-down list where the disks will be connected to the system. Usually, USB drives in Linux are called sdb. In my case, I select it and get the following.
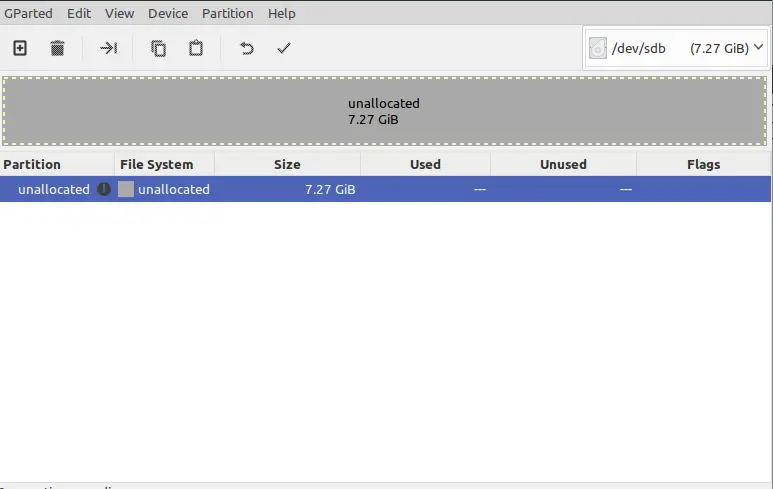
My USB drive is empty. Without any format or partition table, that’s why it looks like this.
First, create a partition table. To do this click on the Device menu and then on Create Partition Table.
When you click, a screen will appear where we will see several types of partition tables. Select msdos and click Apply to start the process.
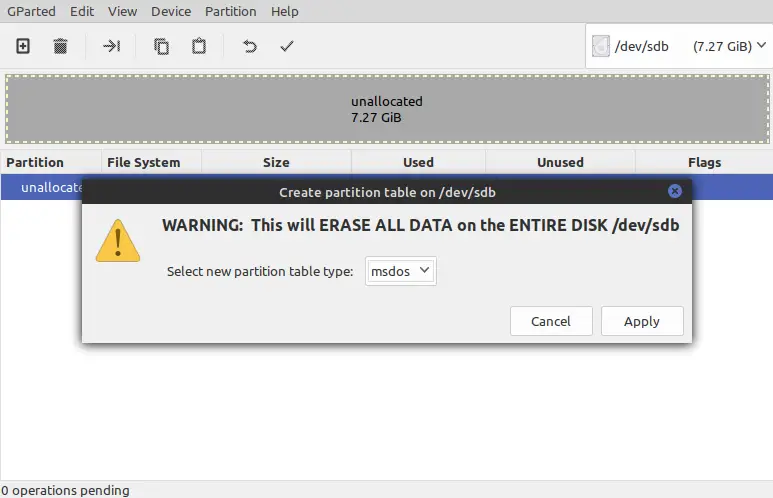
Note: If you already have information in the USB drive, backup it because this process will delete all the information.
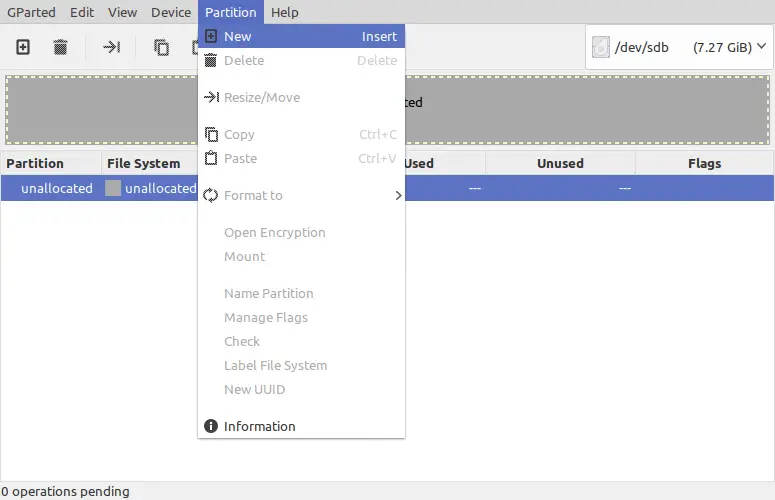
Creating a new Partition and format it
Then go to the Partition menu and click New to create a new partition.
The next thing you’ll see is the Create a New Partition screen. There you can see all the necessary options.
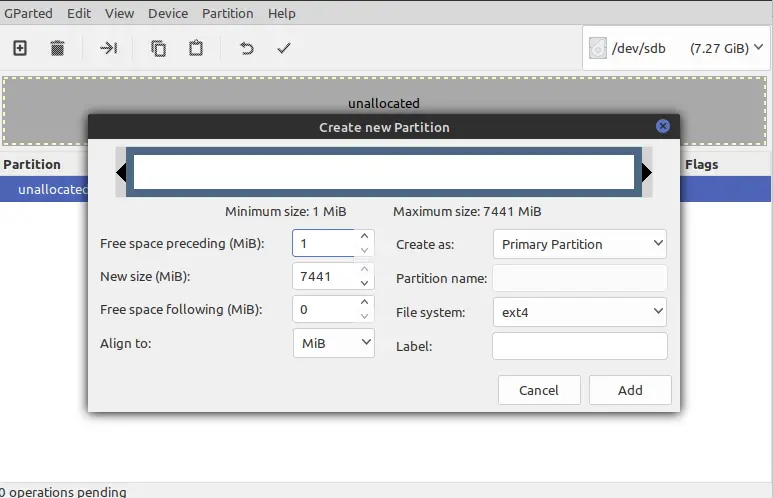
First the size of free space that precedes the partition. Below it, the size of the partition that by default takes the total capacity of the USB drive. You can change this. Then the free space following the partition. Then, the alignment can be MiB, Cylinder, or None. Also if you want to create the partition as primary or extended. You can also define a name and what file system you want to format it with.
There are many file systems if you are going to use USB on many operating systems, you should use FAT32 but if you are going to use it you can only use EXT4. On the contrary, if you only use it in Windows, you can use NTFS.
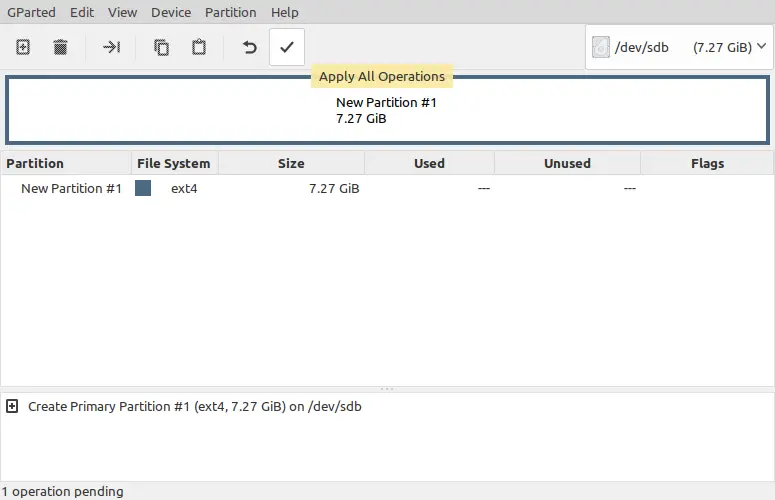
Once you choose all the options, click on Add.
Then, on the main screen confirm the process by clicking the apply button and start the process. However, if you are still not sure about the formatting process, you can undo the changes by clicking on the button next to it.
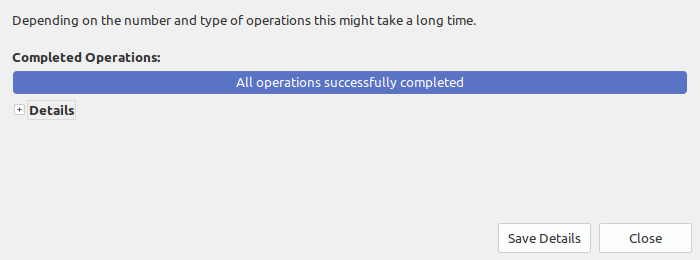
If everything went well, you will see a window confirming it and informing about the changes.
I’ve explained the whole process starting from a USB that had no partition table, but if your USB already had a partition and just format it, just locate the partition, select it and go to the Partition menu and in the Format option to choose the new file system.

Then confirm the process with the apply button and that’s it. So you can format USB in Ubuntu.
Using GParted is the easiest way to format USB in Ubuntu thanks to an easy to use and clear graphical interface.
Format a USB drive in Ubuntu using the terminal
As we know, the terminal is a very important tool in Linux. It is so powerful, versatile, fast, and efficient that many users prefer it before graphic interfaces.
Yes, you can also format a USB drive in Ubuntu using the terminal.
The important thing is to know the path of the USB drive. To do this, open the terminal and execute the command df
df
You will get a screen output similar to this one:
Filesystem 1K-blocks Used Available Use% Mounted on
udev 1884096 0 1884096 0% /dev
tmpfs 382852 6072 376780 2% /run
/dev/sda6 36021876 28111612 6050732 83% /
tmpfs 1914248 81008 1833240 5% /dev/shm
tmpfs 5120 4 5116 1% /run/lock
tmpfs 1914248 0 1914248 0% /sys/fs/cgroup
tmpfs 382848 44 382804 1% /run/user/1000
/dev/sdb1 7433300 16728 7019260 1% /media/user/bd0f17a6-2e22-4095-8348-3fdcb34d5d99
In my case, the USB drive is in /dev/sdb1 so it has to be removed.
sudo umount /dev/sdb1
Then, to format the USB drive with FAT32 file system as we did with GParted, we have to execute the following command:
sudo mkfs.vfat -F 32 -n "pendrive_name" [usb_drive_path]
In this case:
sudo mkfs.vfat -F 32 -n "Example" /dev/sdb1
Note: Be very careful with the path of the USB drive because if you make a mistake or place another one, you might even accidentally delete a partition from the hard drive and run out of the operating system.
Next, I will explain to you the previous command:
- mkfs.vfat: It is a program that serves to format units in Linux. If we combine it with VFAT we will get the FAT file system. Here we will also be able to use another file system for it we would write one of these
mkfs.bfs,mkfs.ext2,mkfs.ext3,mkfs.ext4,mkfs.minix,mkfs.msdos,mkfs.xfs,mkfs.xiafs. and many more. - -F 32 indicates the system to be formatted as FAT 32 specifically.
- -n this option indicates that the USB drive can be named. This name can be a short identifier of not many characters (up to 11).
- Finally, the path is placed where the USB drive is. In this particular case, it is
/dev/sdb1
Once you press the Enter key the process will start and will be irreversible.
If no error occurs on the screen output, then the process is done correctly and the USB drive will be mounted automatically.
Conclusion
In Ubuntu also we can format a USB in a fast and simple way using the best program for it as it is GParted. Not only we will be able to change the file system but also several operations related to partitions and so on.
So you already know how to do it you will not have problems in reviving your USB flash drives or simply deleting all your information.
Help us spreading this post and leaving a comment.