Nagios is a widely-used open-source network monitoring system that keeps an eye on specified hardware and software services, alerting you when their behavior is not as desired. So, if you work with networks or servers, you will want to learn how to install Nagios on Ubuntu or another Linux operating system. This is the purpose of this post.
Install Nagios on Ubuntu 20.04
Preparing the system
Installing Nagios is not complicated but it does require a series of careful steps. So let’s get started.
In a terminal or via SSH, update the distribution completely.
sudo apt update
sudo apt upgrade
Next, install a series of packages that we will need to compile the Nagios package. Also, we need to install a web server such as Apache to take advantage of the program interface.
With this command, install all the dependencies:
sudo apt install build-essential apache2 php openssl perl make php-gd libgd-dev libapache2-mod-php libperl-dev libssl-dev daemon wget apache2-utils unzip
It is recommended to add a new user who can use Nagios. This is for compatibility reasons and the regular user not to be the one using it, which adds an extra layer of security.
sudo useradd nagios
Also, add a new group dedicated to Nagios for the system.
sudo groupadd nagr
Now, add the newly created user named nagios to the newly created group,
sudo usermod -a -G nagr nagr nagios
Then, make the Apache user a member of that group. This ensures that the web interpreter will run correctly.
sudo usermod -a -G nagr www-data
Now the system is ready for the Nagios installation.
Download and install Nagios on Ubuntu 20.04
With the system ready for Nagios, we can download the source package using the wget command. It is recommended to do this in the /tmp/ directory.
cd /tmp
wget https://assets.nagios.com/downloads/nagioscore/releases/nagios-4.4.6.tar.gz
Remember that the command will change depending on the release of a new version.
Decompress the file with the command tar.
tar -zxvf /tmp/nagios-4.4.6.tar.gz
Access the folder that is generated after unzipping and from there configure Nagios before compiling it.
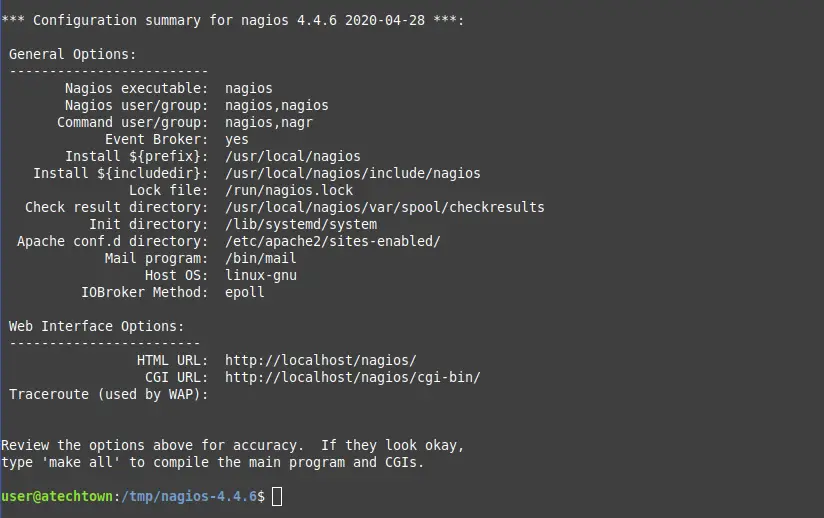
cd nagios-4.4.6/
sudo ./configure --with-nagios-group=nagios --with-command-group=nagr --with-httpd_conf=/etc/apache2/sites-enabled/
Note: If you have chosen other names for the user and group, you have to modify the above command and set the correct values.
When you are happy with the changes and configuration, you can start creating and installing Nagios.
sudo make all
sudo make install
sudo make install-init
sudo make install-config
sudo make install-commandmode
After finishing the installation, you have to properly set the email address of the Nagios admin account. This is a necessary step to configure email alerts.
So, edit the contacts file.
sudo nano /usr/local/nagios/etc/objects/contacts.cfg
And locate the line:
email nagios@localhost
And replace the value with yours.
Save the changes and close the editor.
Now, we have installed Nagios but not its graphical interface so we must do it with the following command
sudo make install-webconf
It is not convenient that anyone can access the Nagios interface. So the default user nagiosadmin must be assigned a password.
sudo htpasswd -c /usr/local/nagios/etc/htpasswd.users nagiosadmin
To apply this change in Apache you have to enable cgi and restart the Apache service
sudo a2enmod cgi
sudo systemctl restart apache2
Install the Nagios Plugins
With Nagios installed, it is convenient to install its plugins as well, which is where its functionality resides.
Download the source package of them in the /tmp/ folder
cd /tmp/
wget https://nagios-plugins.org/download/nagios-plugins-2.3.3.tar.gz
Decompress the file we have downloaded
tar -zxvf /tmp/nagios-plugins-2.3.3.tar.gz
And access to the folder that has been generated
cd nagios-plugins-2.3.3/
And from there, prepare the compilation similarly as we did with Nagios.
sudo ./configure --with-nagios-user=nagios --with-nagios-group=nagr
So, compile and install the Nagios plugins
sudo make
sudo make install
Checking Nagios before using it
Next, it is necessary to check that both Nagios and the plugins are properly configured and this can be done by running
sudo /usr/local/nagios/bin/nagios -v /usr/local/nagios/etc/nagios.cfg
If at the end of the screen output, you get a result similar to this, then Nagios is ready to be started
Things look okay - No serious problems were detected during the pre-flight check
Now it remains to start it and make it start with the system.
sudo systemctl enable nagios
sudo systemctl start nagios
You can check the status of the service as well.
sudo systemctl status nagios
Sample Output:
● nagios.service - Nagios Core 4.4.6
     Loaded: loaded (/lib/systemd/system/nagios.service; enabled; vendor preset: enabled)
     Active: active (running) since Mon 2021-04-05 01:16:24 CEST; 6s ago
       Docs: https://www.nagios.org/documentation
    Process: 42501 ExecStartPre=/usr/local/nagios/bin/nagios -v /usr/local/nagios/etc/nagios.cfg (code=exited, status=0/SUCCESS)
    Process: 42502 ExecStart=/usr/local/nagios/bin/nagios -d /usr/local/nagios/etc/nagios.cfg (code=exited, status=0/SUCCESS)
   Main PID: 42503 (nagios)
      Tasks: 6 (limit: 2286)
     Memory: 2.3M
     CGroup: /system.slice/nagios.service
             ├─42503 /usr/local/nagios/bin/nagios -d /usr/local/nagios/etc/nagios.cfg
             ├─42507 /usr/local/nagios/bin/nagios --worker /usr/local/nagios/var/rw/nagios.qh
             ├─42508 /usr/local/nagios/bin/nagios --worker /usr/local/nagios/var/rw/nagios.qh
             ├─42509 /usr/local/nagios/bin/nagios --worker /usr/local/nagios/var/rw/nagios.qh
             ├─42510 /usr/local/nagios/bin/nagios --worker /usr/local/nagios/var/rw/nagios.qh
             └─42520 /usr/local/nagios/bin/nagios -d /usr/local/nagios/etc/nagios.cfg

Apr 05 01:16:24 imaginelinux nagios[42503]: qh: Socket '/usr/local/nagios/var/rw/nagios.qh' successfully initialized
Apr 05 01:16:24 imaginelinux nagios[42503]: qh: core query handler registered
Apr 05 01:16:24 imaginelinux nagios[42503]: qh: echo service query handler registered
Apr 05 01:16:24 imaginelinux nagios[42503]: qh: help for the query handler registered
Apr 05 01:16:24 imaginelinux nagios[42503]: wproc: Successfully registered manager as @wproc with query handler
Apr 05 01:16:24 imaginelinux nagios[42503]: wproc: Registry request: name=Core Worker 42509;pid=42509
Apr 05 01:16:24 imaginelinux nagios[42503]: wproc: Registry request: name=Core Worker 42508;pid=42508
Apr 05 01:16:24 imaginelinux nagios[42503]: wproc: Registry request: name=Core Worker 42507;pid=42507
Apr 05 01:16:24 imaginelinux nagios[42503]: wproc: Registry request: name=Core Worker 42510;pid=42510
Apr 05 01:16:25 imaginelinux nagios[42503]: Successfully launched command file worker with pid 42520
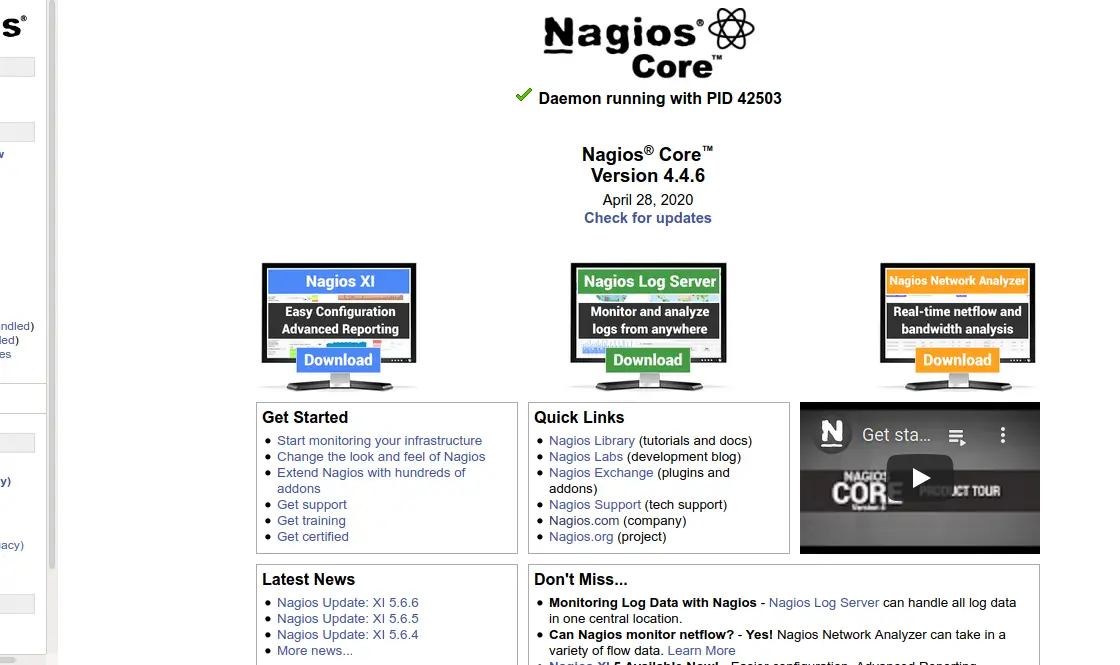
Now you can open a web browser, go to http://your-server/nagios and see the web interface indicating that Nagios is working properly.
Conclusion
Monitoring is basic in Linux, fortunately, there are professional applications that make it a simple and complete process. Of many of them, Nagios is one of the most recognized thanks to its track record in Linux and the support it gives to many distributions.
So, share this post with your friends.