Using MariaDB only from a command interface can be complicated. That is why graphic clients have been created to help with this work. Of all these clients PHPMyAdmin is perhaps the most popular. At least in educational projects. So installing PHPMyAdmin on Ubuntu 18.04 is the main goal of this post as a guide. A graphical client for MariaDB / MySQL is an application that allows us to perform basic and advanced tasks from a graphical interface. This avoids having to use complex commands or terminals. PHPMyAdmin has become popular because it combines a very good graphical interface with the practicality of being a web application. That is, you will probably not have to install any extras on a server.
Apache web server and PHP before installing PHPMyAdmin on Ubuntu
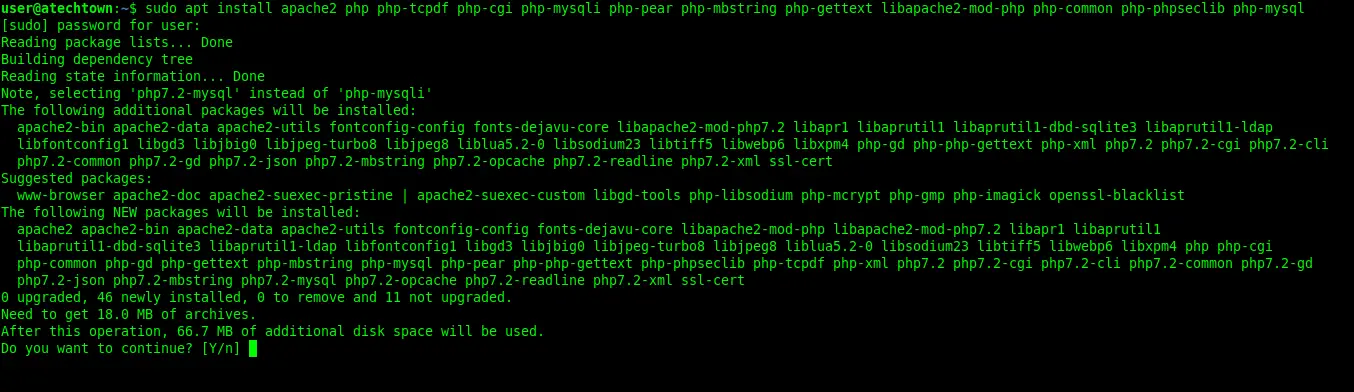
Since it is a web application written in PHP, one of the first steps to be taken is to install a web server. For this tutorial, we will use Apache. For PHPMyAdmin to run on the server, you need to install the PHP language along with some modules. One of the necessary modules is the one that allows the connection between PHP and MariaDB / MySQL. So, let us get started. Like PHP, the apache web server is available in the official Ubuntu repositories. So, all you have to do is run the following command in a terminal:
:~$ sudo apt install apache2 php-tcpdf php-cgi php-mysqli php-pear php-mbstring php-gettext libapache2-mod-php php-common php-phpseclib php-mysql
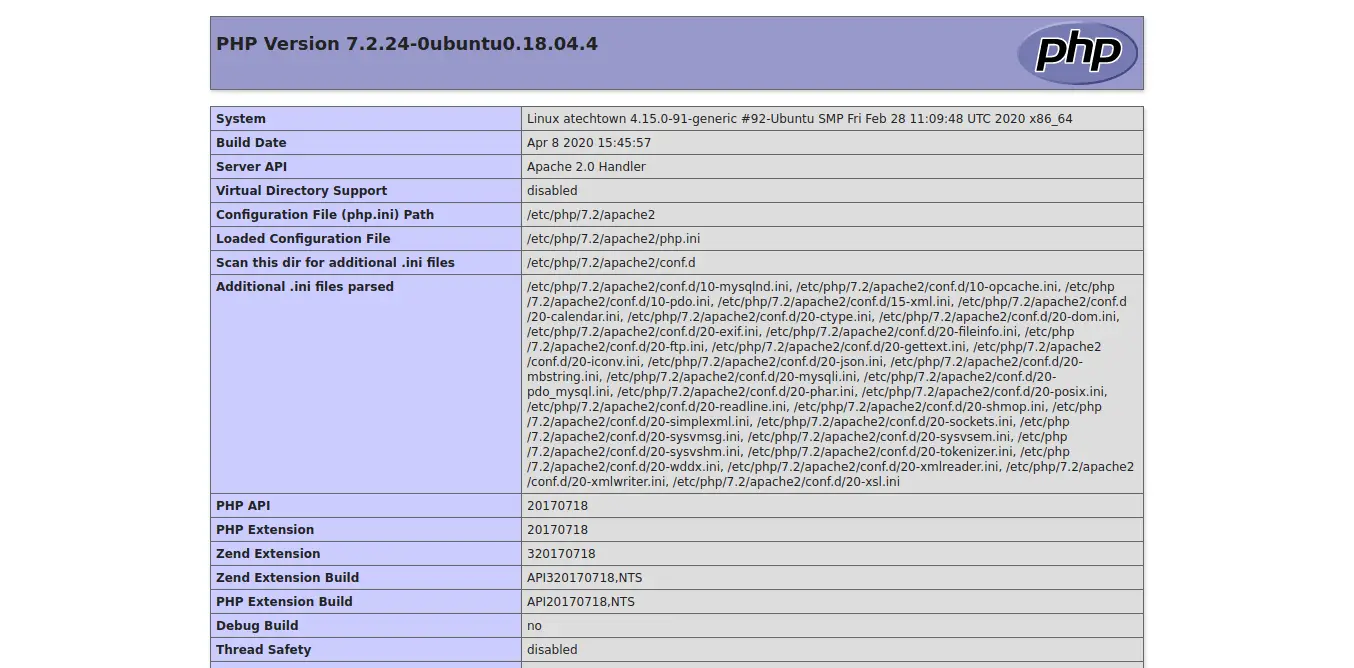
Once the installation process is complete, you should check that Apache and PHP are working properly. The best way to do this is to create a PHP file and open it from the browser. So, create the file:
:~$ sudo nano /var/www/html/test.php
Then, add some PHP code. For example, the phpinfo method is a good option.
<?php
phpinfo();
?>
Save the changes by pressing CTRL + O and exit the editor with CTRL + X.

Open a web browser and go to the following address http://[domain]/test.php or using the server’s IP address http://[IP Address]/test.php The result has to be an image similar to this:
So, let us continue.
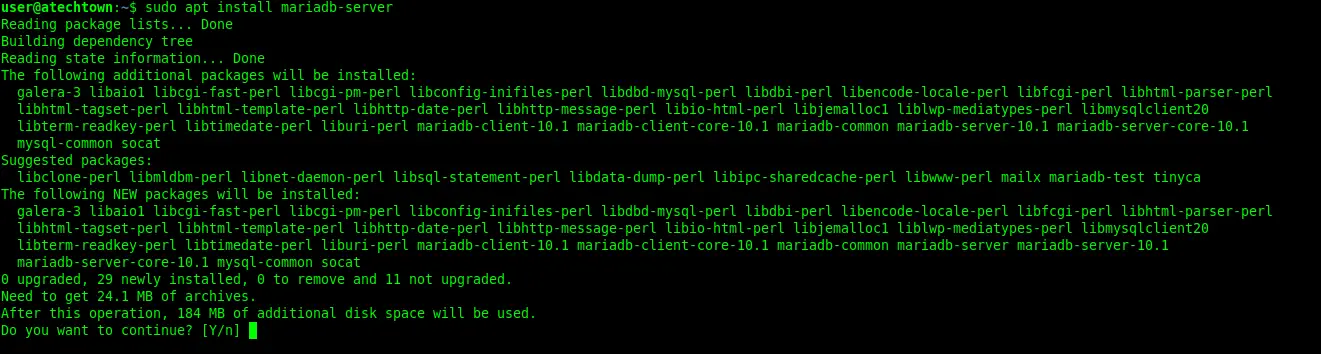
Install MariaDB on Ubuntu
So, you already have what is necessary for the correct execution of PHPMyAdmin but something else important is missing: what it will manage. So if you do not have MariaDB installed, you have to do it. Installing MariaDB in Ubuntu is a matter of one command:
:~$ sudo apt install mariadb-server
By default, the installation does not include the definition of a root password. Therefore, it has to be defined for security reasons. For this purpose, it is necessary to use the mysql_secure_installation script
:~$ sudo mysql_secure_installation
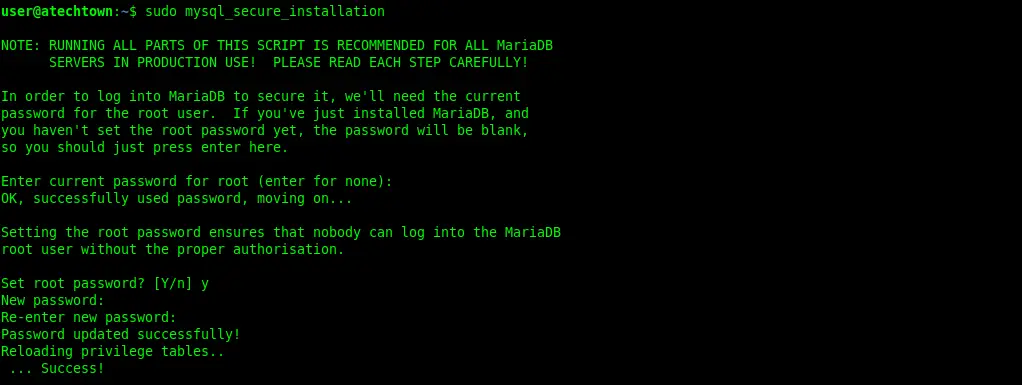
At first, you will be asked to enter a root password. Remember that it does not exist yet, so just press the enter key. Then, you can define your own. Next, you will see some configuration questions. If you do not want any problems, you can answer all of them with the “y” key. By default, MariaDB assigns an authentication plugin to the root user. This means that you cannot use PHPMyAdmin with this user. To fix this, go to the MariaDB console and modify that plugin.
:~$ sudo mysql -u root
use mysql;
update user set plugin='' where User='root';
flush privileges;
exit
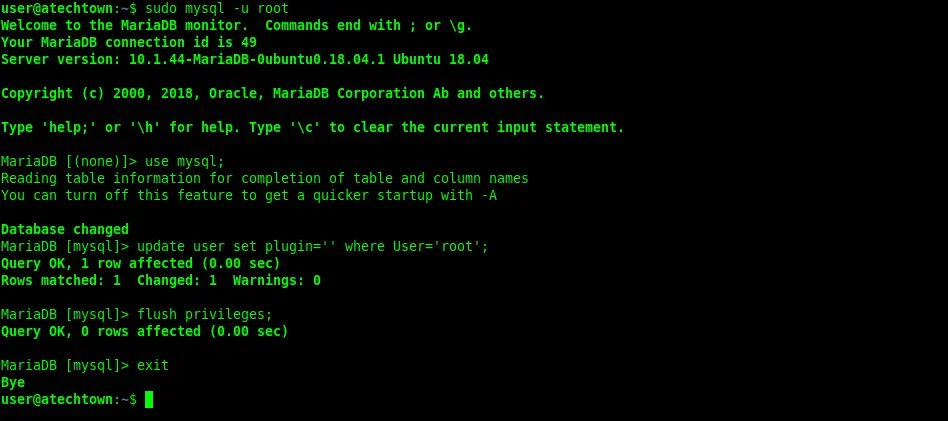
As you may have noticed, in the end, you have to refresh user privileges in the database.
Download PHPMyAdmin on Ubuntu
On the PHPMyAdmin website, you can find the download section. In it, you can get the latest stable version which so far is 5.0.2 To download from the terminal run this command:
:~$ cd /tmp/
:~$ wget https://files.phpmyadmin.net/phpMyAdmin/5.0.2/phpMyAdmin-5.0.2-all-languages.tar.gz
When the download is complete, unzip it into another folder such as /usr/share/
:~$ sudo tar xvzf phpMyAdmin-5.0.2-all-languages.tar.gz -C /usr/share/
To better manage the folder, it should be renamed to a simpler name.
:~$ sudo mv /usr/share/phpMyAdmin-5.0.2-all-languages/ /usr/share/phpmyadmin
Then you have to create two configuration folders. The first will contain the temporary PHPMyAdmin files. And the second one where there will be some settings.
:~$ sudo mkdir -p /var/lib/phpmyadmin/tmp
:~$ sudo mkdir /etc/phpmyadmin/
Now, change the permissions of the temporary folder so that Apache can use it without problems.
:~$ sudo chown -R www-data:www-data /var/lib/phpmyadmin
Next, copy the default configuration of PHPM and Admin and transform it into the enabled configuration.
:~$ sudo cp /usr/share/phpmyadmin/config.sample.inc.php /usr/share/phpmyadmin/config.inc.php

Configuring PHPMyAdmin on Ubuntu
In the main configuration file of PHPMyAdmin, there are two things to do. The first is to define a secret passphrase. This has to be as strong as possible and you should keep it. As this is a tutorial we chose a not so strong one. So, open the file:
:~$ sudo nano /usr/share/phpmyadmin/config.inc.php
And find this line:
$cfg ['blowfish_secret']
And define your secret passphrase:
$cfg['blowfish_secret'] = '3X@mplE';
The second thing you have to do is indicate which folder will be the temporary files of PHPMyAdmin. So add this line:
$cfg['TempDir'] = '/var/lib/phpmyadmin/tmp';

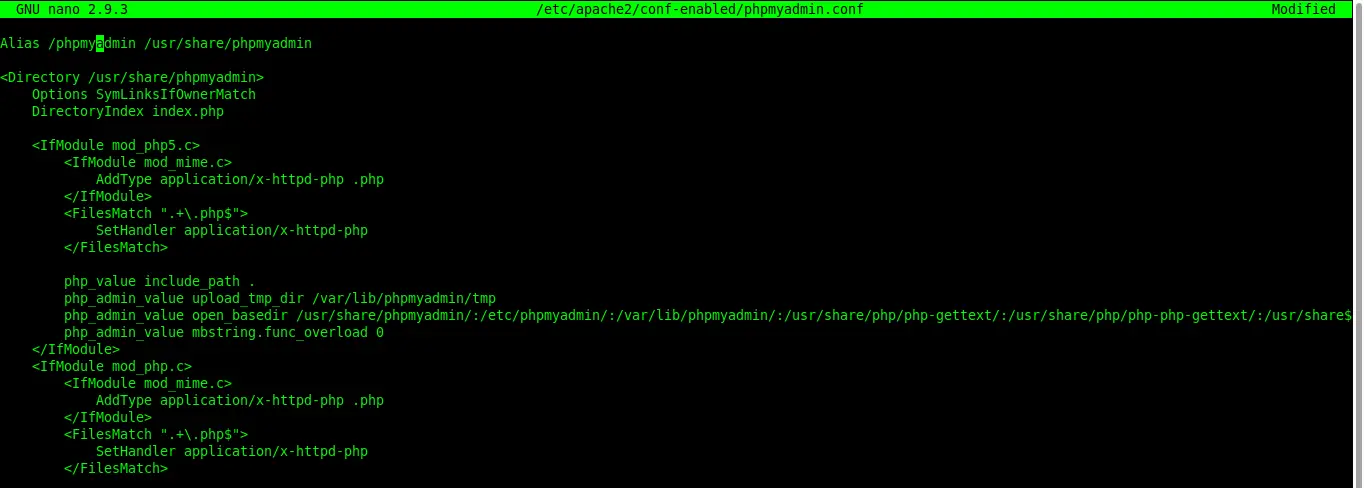
Again, save the changes and close the file. Next, create an Apache configuration file for PHPMyAdmin. This will contain interpretation rules like this and other things.
:~$ sudo nano /etc/apache2/conf-enabled/phpmyadmin.conf
And in the file, add the following content:
Alias /phpmyadmin /usr/share/phpmyadmin

<Directory /usr/share/phpmyadmin>
    Options SymLinksIfOwnerMatch
    DirectoryIndex index.php

    <IfModule mod_php5.c>
        <IfModule mod_mime.c>
            AddType application/x-httpd-php .php
        </IfModule>
        <FilesMatch ".+\.php$">
            SetHandler application/x-httpd-php
        </FilesMatch>

        php_value include_path .
        php_admin_value upload_tmp_dir /var/lib/phpmyadmin/tmp
        php_admin_value open_basedir /usr/share/phpmyadmin/:/etc/phpmyadmin/:/var/lib/phpmyadmin/:/usr/share/php/php-gettext/:/usr/share/php/php-php-gettext/:/usr/share/javascript/:/usr/share/php/tcpdf/:/usr/share/doc/phpmyadmin/:/usr/share/php/phpseclib/
        php_admin_value mbstring.func_overload 0
    </IfModule>
    <IfModule mod_php.c>
        <IfModule mod_mime.c>
            AddType application/x-httpd-php .php
        </IfModule>
        <FilesMatch ".+\.php$">
            SetHandler application/x-httpd-php
        </FilesMatch>

        php_value include_path .
        php_admin_value upload_tmp_dir /var/lib/phpmyadmin/tmp
        php_admin_value open_basedir /usr/share/phpmyadmin/:/etc/phpmyadmin/:/var/lib/phpmyadmin/:/usr/share/php/php-gettext/:/usr/share/php/php-php-gettext/:/usr/share/javascript/:/usr/share/php/tcpdf/:/usr/share/doc/phpmyadmin/:/usr/share/php/phpseclib/
        php_admin_value mbstring.func_overload 0
    </IfModule>

</Directory>

# Authorize for setup
<Directory /usr/share/phpmyadmin/setup>
    <IfModule mod_authz_core.c>
        <IfModule mod_authn_file.c>
            AuthType Basic
            AuthName "phpMyAdmin Setup"
            AuthUserFile /etc/phpmyadmin/htpasswd.setup
        </IfModule>
        Require valid-user
    </IfModule>
</Directory>

# Disallow web access to directories that don't need it
<Directory /usr/share/phpmyadmin/templates>
    Require all denied
</Directory>
<Directory /usr/share/phpmyadmin/libraries>
    Require all denied
</Directory>
<Directory /usr/share/phpmyadmin/setup/lib>
    Require all denied
</Directory>
Once again, save the changes and close the editor. To apply the changes, simply restart the Apache service.
:~$ sudo systemctl restart apache2
Test the PHPMyAdmin installation
You have already finished the installation, but it is worthless if the results are not positive. To check if PHPMyAdmin is correctly installed, open a web browser and go to http://ip-address/phpmyadmin or http://domain/phpmyadmin If everything went well, you will need to see the login screen.
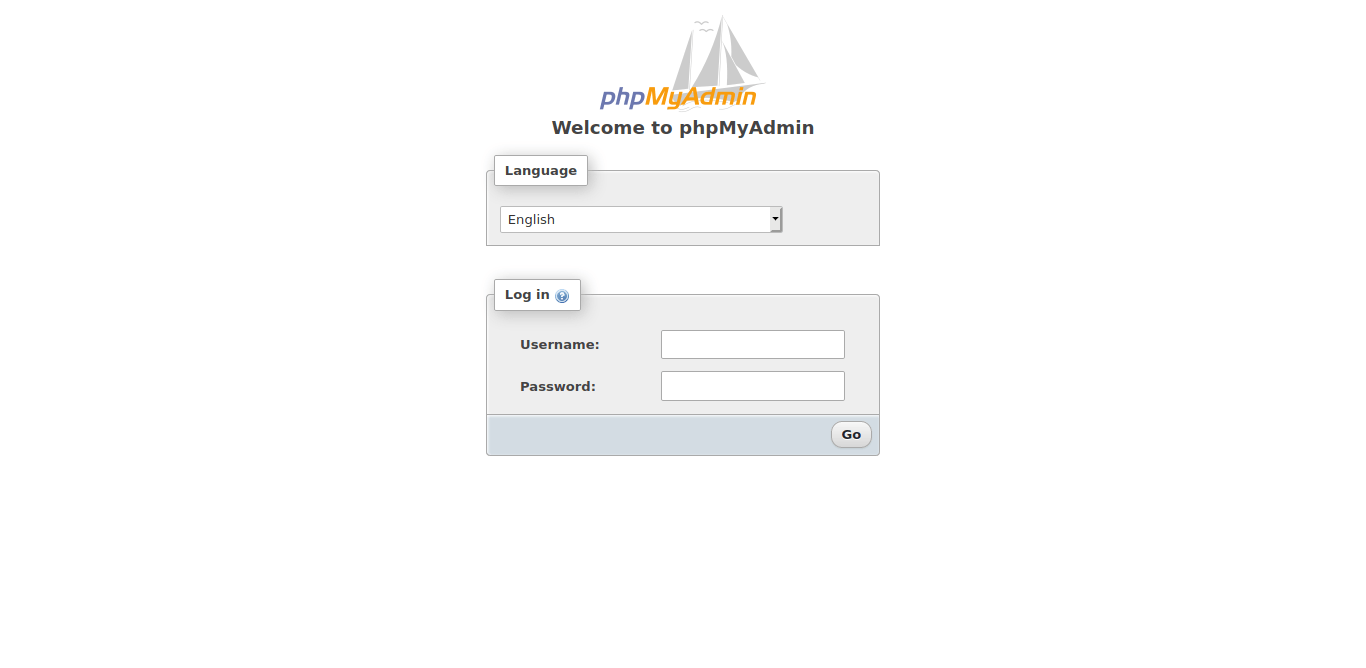
Log in with your user account and you can start using PHPMyAdmin.
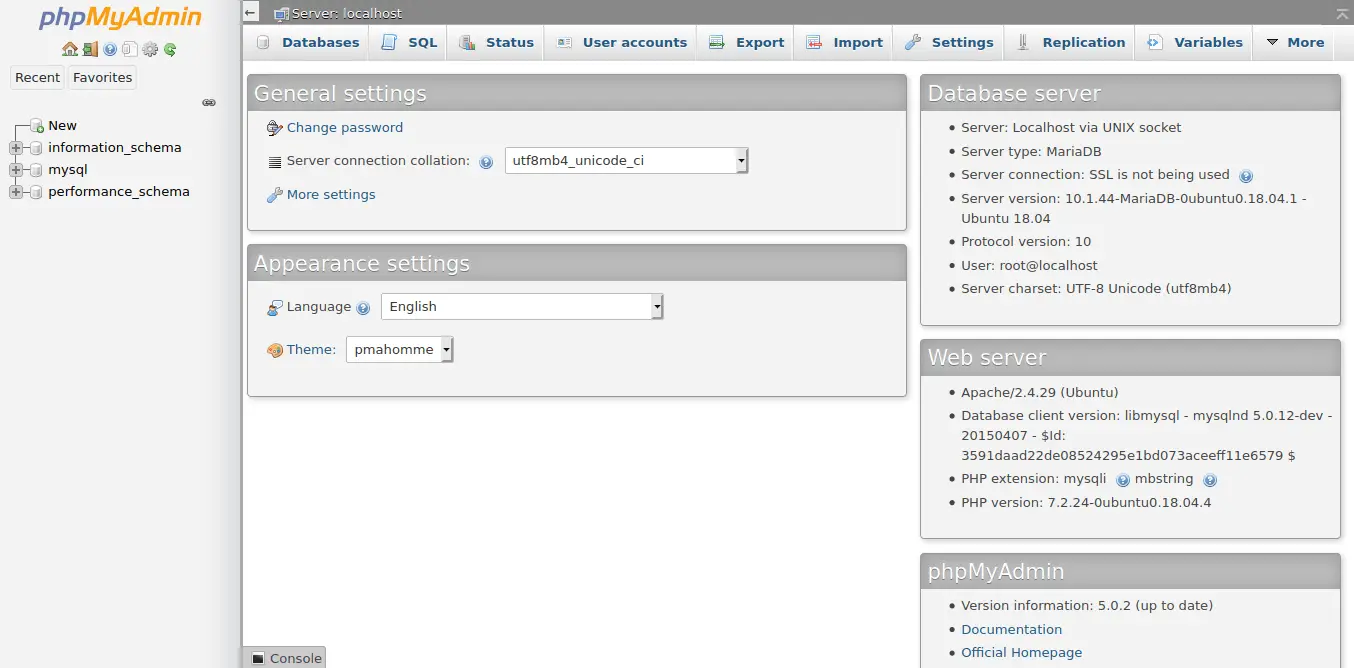
We are done. You can enjoy your new PHPMyAdmin now.
Conclusion
With PHPMyAdmin, you can have a very useful tool to manage a MariaDB or MySQL instance. This can be quite useful if you work with it frequently. On the other hand, PHPMyAdmin is quite easy to install and only requires a working PHP webserver to run. This makes many servers ready for PHPMyAdmin to run. We want to hear from you, do you like PHPMyAdmin? Have you used it? Did you know it?