Samba is a very popular tool among sysadmin and more novice users. Thanks to it we can share one or more folders across the network. This is quite useful in companies but also in small networks such as a home. So, today, you will learn how to install and configure Samba on CentOS 8.
CentOS 8 is a very popular operating system for servers. As it is a binary level clone of RHEL, it guarantees stability, robustness, and compatibility with many applications. These security policies are the reason why CentOS 8 is the basis of many servers.
Install Samba on CentOS 8
Samba is available in the official CentOS repositories as well as other distributions. Therefore, what we have to do is to open a new SSH or terminal session.
Then, update the whole system.
sudo dnf update
Then install the Samba related packages for the server and the client. It is recommended to install both packages.
sudo dnf install samba samba-client
After installing these packages two services called smb and nmb are added which are related to Samba.
Unlike Ubuntu, in CentOS, we have to initiate and enable the services manually using systemctl command.
sudo systemctl enable smb
sudo systemctl enable nmb
sudo systemctl start smb
sudo systemctl start nmb
Then you can check the status of the services
sudo systemctl status smb
sudo systemctl status nmb
Then you have to open the ports that Samba uses in the CentOS firewall. To do this, run:
sudo firewall-cmd --permanent --add-service=samba
And restart the Firewall.
sudo firewall-cmd --reload
Now we will proceed to configure Samba for two cases. The first is the case of a public folder that can be read and written by any user anonymously. This is not recommended in production environments but can be useful in-home cases.
On the other hand, the other case is a folder restricted by a user and password that increases security and makes it ideal in productive cases.
Configuring Samba for a public folder
The Samba configuration file is /etc/samba/smb.conf and the file is well documented. So editing it should not be a problem.
First, create the folder you want to share.
sudo mkdir -p /var/samba/public/
Feel free to modify the path and name. Then, assign read and write permissions to it:
sudo chmod 777 -R /var/samba/public/
Then create a backup of the configuration file to avoid problems:
sudo cp /etc/samba/smb.conf /etc/samba/smb.conf.bak
In case you don’t have sudo enabled, execute the commands with the root user.
Then, edit the file with your favorite text editor:
sudo nano /etc/samba/smb.conf
In the Global section, check that the value of Workgroup is the same as your network.
[global]
workgroup = WORKGROUP
And then, add to the end of the file the following information
[public]
   path = /var/samba/public/
   guest only = yes
   writable = yes
   map to guest = bad user
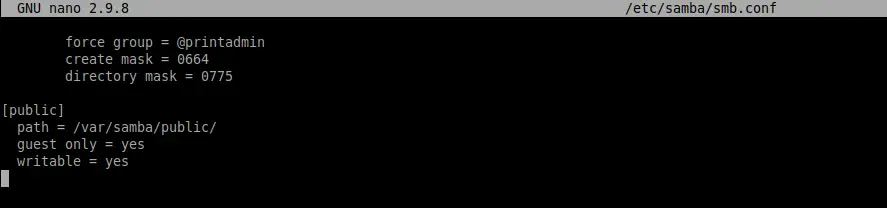
Then save the file and close it.
To apply the changes, restart Samba services.
sudo systemctl restart smb
sudo systemctl restart nmb
Now from a client computer, you access through the IP address or the hostname of the server. And you will be able to see the shared folder.
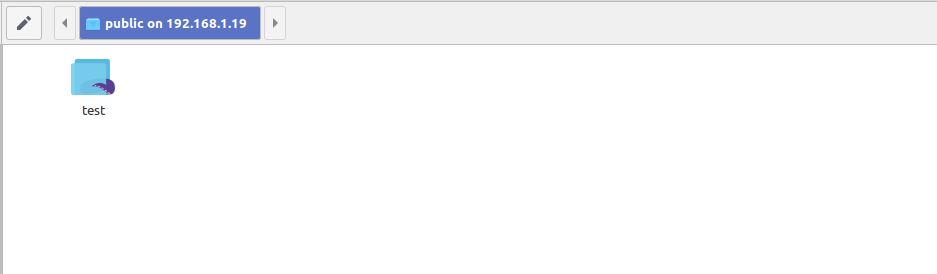
Within it, you can create files and folders in the same way.
Note: if you have SELinux active, then you have to run the following command:
sudo chcon -R -t samba_share_t /var/samba/public/
Configuring Samba and a private folder
Having a public folder carries a risk that many do not want to take. This does not make it suitable for production environments. So it is recommended to use private folders that require a user and a password to access them.
So what we will do is create a new user that cannot be logged in to the system and assign a samba password.
First, create the user using useradd command.
sudo useradd -M -s "/sbin/nologin" smbuser
Replace smbuser with the name of the user you want. The -M option indicates that a home directory will not be created and -s the shell you will use that in this case does not allow login.
Then, assign a Samba password.
sudo smbpasswd -a smbuser
Output:
New SMB password:
Retype new SMB password:
Added user smbuser.
After this, create the folder you want to share and assign specific permissions.
mkdir -p /var/samba/private/
chmod 777 -R /var/samba/private/
Feel free to change the name and location of the folder.
Then, edit the Samba settings file again to add the following to the end of the file:
sudo nano /etc/samba/smb.conf
[private]
   path = /var/samba/private/
   guest only = no
   writable = yes
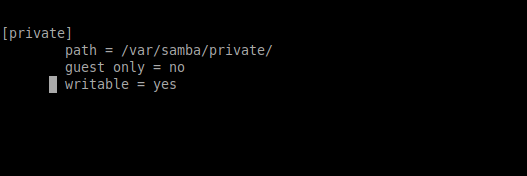
Save the changes and close the editor.
To apply the changes, restart the samba.
sudo systemctl restart smb
 sudo systemctl restart nmb
Again, if you have SELinux active, run this command:
sudo chcon -R -t samba_share_t /var/samba/private/
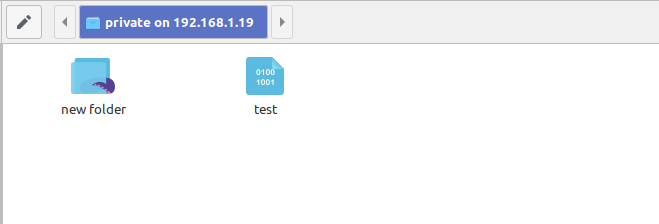
Then, access from a file browser to access the folder.
As you can see, the credentials are requested
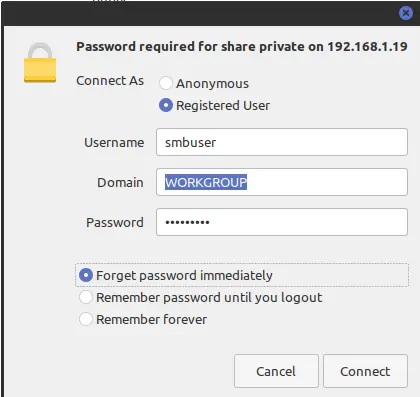
By entering them you can access the folder and work on it.
Congratulations now Samba is ready at CentOS 8
Conclusion
Samba is an essential tool in every server and a system like CentOS 8. Now that you know how to do it using CentOS 8 you can take full advantage of the folders shared with Samba
So, tell us? do you like samba? have you used it? Leave us a comment and share the post.